Integrating Google One Tap with OneLogin
User authentication can be a complex problem. The first – and often most essential – step is to sign in.
As an app developer, you often need to implement various authentication mechanisms in sign-in pages, including those with Google or Facebook credentials, as well as a custom username and password. Designing multiple sign-in methods can be an arduous task for you, and the fragmented user experience might confuse your apps’ users.
Enter Google One Tap, which displays a prompt on top of your app page enabling your users to sign in to, or sign up for, your app with just one tap using their Google account. They can also sign back into your app with only one tap.
This works nicely. However, you still have to provide user management for your applications.
OneLogin is the identity platform that allows your users to quickly sign in to, or sign up for, your application, and then enables you to manage them using the OneLogin Administration Portal.
OneLogin provides a comprehensive JSON-based REST API secured by OAuth 2.0. OneLogin also lets you access all the API methods through convenient development kits available in a number of programming languages, including OneLogin Python SDK.
In this tutorial, we’ll create a demo web app where users sign in quickly and securely with One Tap, and where we then use OneLogin to store and manage their user accounts. We assume that you know your way around Python and Django, and that you are familiar with the authentication and authorization concepts.
Prerequisites
Get version 3.x of Python and follow the installation instructions.
Install the Django web framework.
Install and use an IDE of your preference to implement and build the project.
Create Django Demo Project
Create a web project based on Django to demonstrate the One Tap integration with OneLogin.
From the command line, go to a directory where you’d like to store your code, then run the following command to create a new Django project named demoweb:
django-admin startproject demowebChange the urls.py file to add a path to a new index view named index:
from demoweb import views

…
urlpatterns = [
    path('admin/', admin.site.urls),
    path('', views.index, name='index')
]
Create the
views.pyfile to hold the logic for handling web requests on the server side:from django.http import HttpResponse from django.shortcuts import render def index(request): return render(request, 'index.html')Create a new folder called templates, then create the new
index.htmlfile in that folder, with the following content:<!DOCTYPE html> <html> <head></head> <body> <h1>Integrating Google One Tap with OneLogin</h1> </body> </html>Modify the
DIRSline in thesettings.pyfile to include the templates folder:'DIRS': [os.path.join(BASE_DIR, 'templates')],Finally, run the app to see the view contents:

Configure One
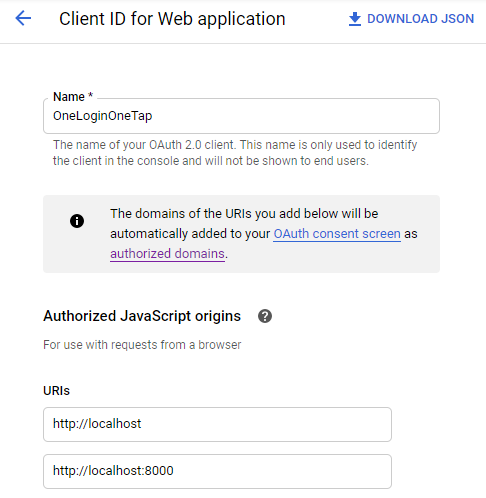
Follow the instructions for Getting your Google API client ID to register and configure Google One Tap for your application.
After you have registered, create a new app on the One Tap page, and define your web app URIs (http://localhost and http://localhost:8000) in the app credentials under Authorized JavaScript origins:
Implement One Tap in Your Web App
Include the One Tap JavaScript API in the client HTML page to prompt the user. To implement Google One Tap in your web app, modify the
templates/index.htmlfile to include this line:<script src="https://accounts.google.com/gsi/client" async defer></script>Add this code snippet to the
index.htmlfile to prompt the user:<html> <body> <h1>Integrating Google OneTap with OneLogin</h1> </body> <script src="https://accounts.google.com/gsi/client" async defer></script> <script> window.onload = function () { google.accounts.id.initialize({ client_id: '' }); google.accounts.id.prompt(); }; </script> </html>Note: We have to provide the one_tap_client_id parameter in the above script. Modify the views.py file to pass the client ID of your One Tap app as a parameter to be rendered in the index view:… def index(request): return render(request, 'index.html', {'one_tap_client_id': ***YOUR ONE TAP CLIENT ID***})Run the app and see how Google One Tap prompt is displayed on your home page. Note: One Tap suggests the account of the user who is logged into the browser. (And it works in multiple languages!)
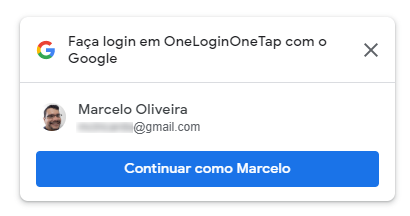
With just one click, the user – already authenticated and authorized – will close the Google One Tap dialog and start using the app. The catch is that the web app still doesn’t know who the user is.
Receive an Authentication Callback from One Tap
Add the callback field to the object passed in the initialize function call. This field contains the function that handles the credentials returned from the browser’s credential manager.
Include the jQuery JavaScript library in the
index.htmlpage to make the AJAX call, this will pass those credentials to the web app back end:<script src="https://code.jquery.com/jquery-3.5.1.min.js" ></script>Implement the callback function to pass the credentials to the one-tap-login/ endpoint:
window.onload = function () {
   google.accounts.id.initialize({
      client_id: '',
      callback: function (credentialResponse) {
         let response = credentialResponse;
         $.ajax({
            type: 'POST',
            url: '/one-tap-login/',
            headers: {
               'X-Requested-With': 'XMLHttpRequest'
            },
            contentType: 'application/JSON; charset=utf-8',
            data: JSON.stringify({credential: response.credential})
         });
      }
   });
   google.accounts.id.prompt();
};
Now, modify the
urls.pyfile to include a new path for the one-tap-login endpoint.path('one-tap-login/', views.one_tap_login, name='one_tap_login')Next, modify the views.py file to add the new endpoint:
from django.views.decorators.http import require_http_methods
from django.views.decorators.csrf import csrf_exempt
…
@csrf_exempt
@require_http_methods(["POST"])
def one_tap_login(request):
Get the JSON Web Token (JWT) in the One Tap credentials and decode its contents to pass the user name as a parameter to the view:
import json
import jwt
…
def one_tap_login(request):
    received_json_data = json.loads(request.body)
    credential = received_json_data['credential']
    decoded = jwt.decode(credential, verify=False)
    return HttpResponse(content=decoded['name'])
Modify the
\templates\index.htmlfile to display a greeting to the logged-in user.$.ajax( ... success: function(result) { document.getElementsByTagName('h1')[0].innerHTML = "Welcome, " + result + "!"; }, ... });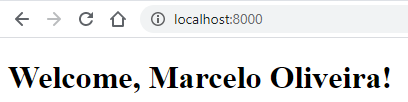
Create the User Area View
Now it’s time to implement a new User Area view where the user can see their profile details stored in the user session.
By default, Django stores sessions in an SQLite database file named db.sqlite3.
Before using sessions, run the following command to install the database file that stores session data:
python manage.py migrateModify the
views.pyfile to create a user object, store it in the session, and pass it as a parameter to the view.@csrf_exempt @require_http_methods(["POST"]) def one_tap_login(request): received_json_data = json.loads(request.body) credential = received_json_data['credential'] decoded = jwt.decode(credential, verify=False) user_data = { "name": decoded['name'], "email": decoded['email'], "given_name": decoded['given_name'], "family_name": decoded['family_name'] } json_user_data = json.dumps(user_data) request.session['user_data'] = json_user_data return HttpResponse(json_user_data, content_type="application/json")Modify the
\templates\index.htmlfile to reload the page:success: function(result) { location.reload(); },Modify the index function in
views.pyto retrieve the user data stored in the session and display a newuser-area.htmlview file if the user is signed in:def index(request): if request.session.get('user_data') is not None: user_data = json.loads(request.session['user_data']) return render(request, 'user-area.html', {'user_data': user_data}) return render(request, 'index.html', {'one_tap_client_id': ***ONE_TAP_CLIENT_ID***})Add the new
user-area.htmlfile to the\templatesfolder and enter the following HTML code in this file:<!DOCTYPE html> <html> <head></head> <body> <h1>User Area</h1> <ul> <li>Name: </li> <li>Email: </li> <li>First Name: </li> <li>Last Name: </li> </ul> </body> </html>To implement the logout functionality by modifying the
urls.pyfile to include this new/logoutpath:path('logout/', views.logout, name='logout'),Modify the
views.pyfile to add a new logout view function. Here, we want to update the session to reset the user data:from django.http import HttpResponse, HttpResponseRedirect ... def logout(request): request.session['user_data'] = None return HttpResponseRedirect('/')Add a button to the
\templates\user-area.htmlfile to call the new logout function:<p><input type="submit" onclick="location.href='/logout/'" value="Log out"/>Run the application to test the new
user-areaview and the logout functionality: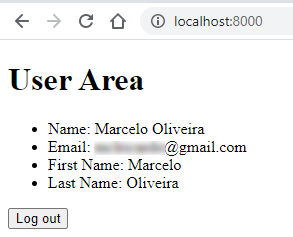
Sign up for a new OneLogin Account
In what we’ve put together so far, the web app allows the incoming Google users to sign in, but it can’t manage those users’ accounts: you can’t properly store, manage, assign roles, or define user states. Let’s see how we can integrate OneLogin into our application flow to fill those gaps.
Follow the steps in the Sign Up for the OneLogin Trial document to create a new free account.
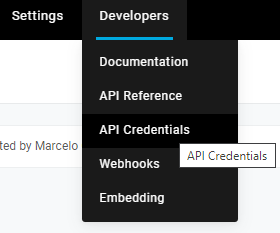
Login to the OneLogin Admin Portal and go to Developers > API Credentials.
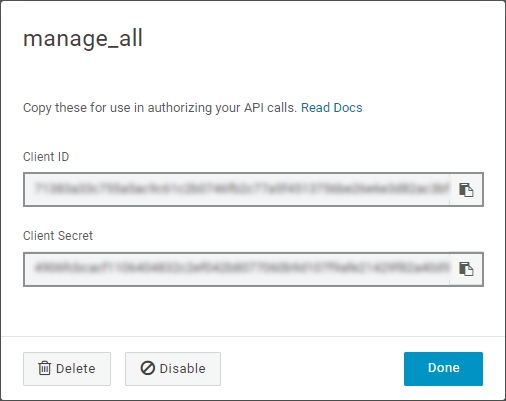
Create a new API credential. The Client ID and Client Secret values will grant you access to the OneLogin API as shown in the next section.
Create a New User at OneLogin
Let’s make our solution store and manage users that sign in with One Tap.
Open the
views.pyfile and add these imports that reference the OneLogin Python SDK:from onelogin.saml2.auth import OneLogin_Saml2_Auth from onelogin.saml2.settings import OneLogin_Saml2_Settings from onelogin.saml2.utils import OneLogin_Saml2_Utils from onelogin.api.client import OneLoginClientTo make sure that the user you want to create does not exist yet, create a new instance of
OneLoginClientfrom the OneLogin Python SDK.Using your OneLogin app’s API credentials (Client ID and Client Secret) plus your region (“us”) as parameters. Replace the parameters below with the API access credentials found at
https://[YOUR_ACCOUNT_NAME]-dev.onelogin.com/api_credentials:@csrf_exempt @require_http_methods(["POST"]) def one_tap_login(request): ... client = OneLoginClient( ***ONELOGIN_CLIENT_ID***, ***ONELOGIN_CLIENT_SECRET***, 'us' )Call the
get_usersfunction to check if the user exists.users = client.get_users({ "email": decoded["email"] })If the user doesn’t exist yet, we access the user data stored in the session and parse it into parameters to the
create_userfunction:if len(users) == 0: new_user_params = { "email": decoded["email"], "firstname": decoded["name"], "lastname": decoded["given_name"], "username": decoded["family_name"] } created_user = client.create_user(new_user_params)Obtain the
Defaultrole and assign it to the created user:... if created_user is not None: roles = client.get_roles({ "name": "Default" }) if len(roles) == 1: role_ids = [ roles[0].id ] client.assign_role_to_user(created_user.id, role_ids) return HttpResponse(json_user_data, content_type="application/json")Set the user state to Approved:
...
if created_user is not None:

    ...

    roles = client.get_roles({
        "name": "Default"
    })

    USER_STATE_APPROVED = 1
    client.set_state_to_user(created_user.id, USER_STATE_APPROVED)

return HttpResponse(json_user_data, content_type="application/json")
Run the application and repeat the login/logout cycle to see if everything is working as before.
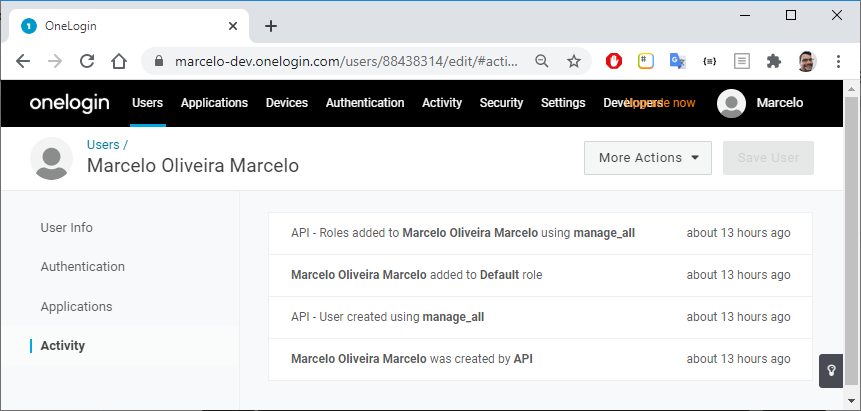
Open up the User page in your OneLogin portal and note that the Gmail user was added and assigned to the Default role.
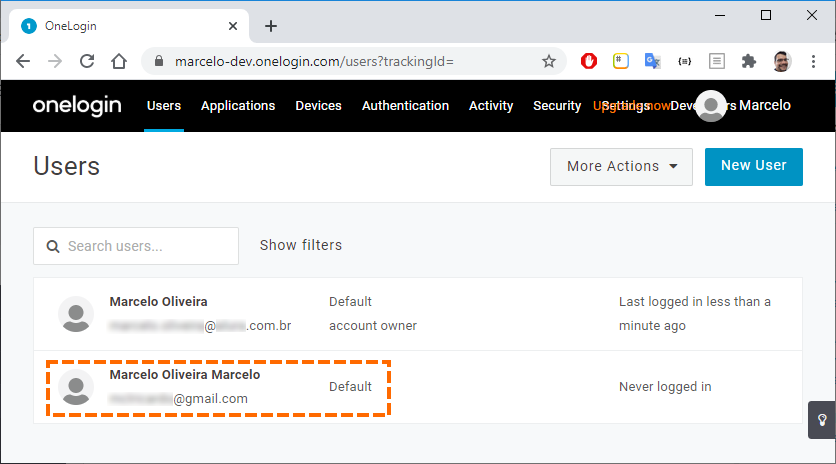
The details show that the Gmail user is also associated with the web app.
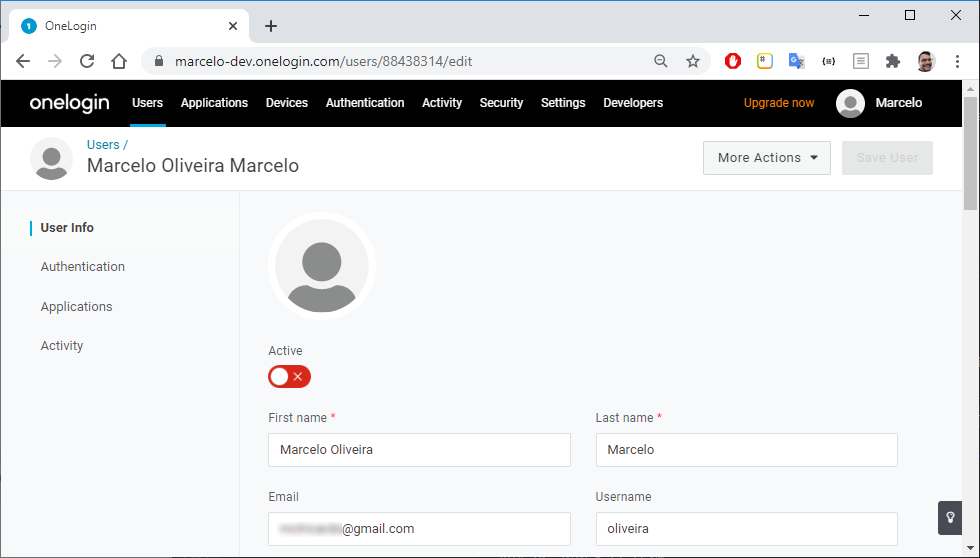
From now on, you can store and manage Gmail users in the OneLogin portal. The Activity tab shows all the activities involving that user account.
Have a Question?

Found a problem or a bug? Submit a support ticket.

Looking for walkthroughs or how-to guides on OneLogin's user and admin features? Check out the documentation in our Knowledge Base.

Have a product idea or request? Share it with us in our Ideas Portal.