How to establish a OneLogin session via API using CORS
When working with services or applications, you often need to implement secure interaction between a user and the service or application. It’s also important for the application stack to be secure and only permit authenticated users to access its protected resources. To do this, we use authentication — a process that verifies that the user is exactly who they claim to be.
Authentication provides access control for applications, services, or systems by matching a user’s credentials with the authorized users’ credentials stored in a database or on an authentication server. If the credentials match, the user is authenticated, and the process is completed by granting — or authorizing — the user access to specific resources.
In a traditional authentication approach, the server would authenticate users using its own, locally implemented system — typically usernames and passwords. But that comes at the cost of developer time and introduces the risks inherent in all in-house authentication solutions.
One way to avoid these risks is to use authentication tools offered by identity and access management providers, such as OneLogin. OneLogin offers a cloud-based, unified access management platform for enterprise-level businesses and organizations. The platform is developer-friendly and delivers identity management services without sacrificing end-user experience.
OneLogin also supports a standard authentication and sign-in process — complete with a sign-in screen — so you don’t have to add your own to your web app.
Sometimes, however, you’ll want to use your own, custom login page. In this case, you can first sign the user in via the OneLogin API. Once that is complete there are two options to create a session once you have authenticated a user.
One option is to perform a standard form POST, which will redirect the browser to OneLogin and then back again.
You can also use Cross-Origin Resource Sharing (CORS) to submit the request using JavaScript. The benefit of this approach is that you don’t have a browser redirect. The downside is that some browsers are starting to lock down on session cookies being shared via CORS.
In this article, we’ll walk you through the creation of a working Python application using Flask that signs a user in and starts a OneLogin session using CORS requests.
Configure OneLogin
OneLogin encourages you to set up a developer account to experiment with their services. Once you have your account in place, create your API credentials.
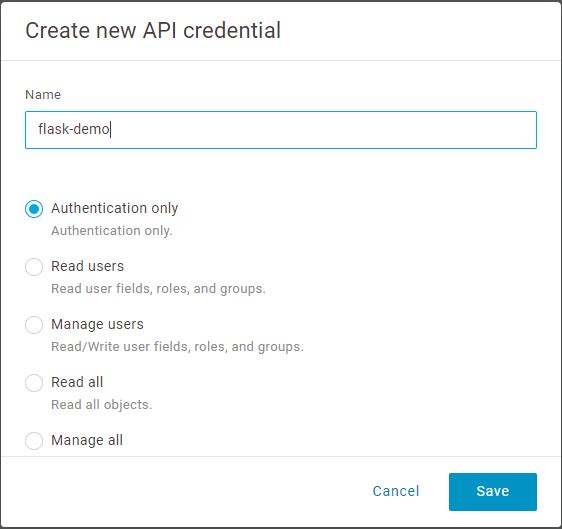
From the navigation bar, go to Developers > API Credentials. Create new credentials by clicking New Credentials in the top right corner.
Enter a name, then select the Authentication only scope.
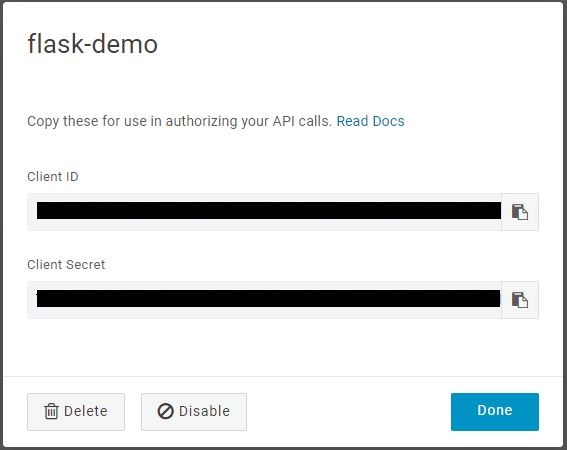
Clicking Save will generate a client ID and client secret. We’ll need these credentials when configuring our application to connect to OneLogin.
Configure the Flask Application
The next step is to create a simple Flask application that displays a custom login page. We are assuming that you already have Flask installed and know how to handle it. If not follow the Flask quick start guide. Feel free to use Visual Studio Code or any IDE of your choice to create a template application.
Edit your requirements.txt file as follows.
Fabric
Flask-WTF
WTForms
coverage
onelogin
We’ll discuss the use of each of these requirements as we proceed.
To work with OneLogin API, we need to create a client for OneLogin in our application. Create the client in your app.py file with this code.
client = OneLoginClient(
    client_id= {your client ID},
    client_secret= {your client secret}
)
We want the application to display a login screen where a user can enter their username and password. We will use WTForms to set up our login form. Create the form.py file and add the following code to it.
from flask_wtf import FlaskForm
from wtforms import TextField, PasswordField
from wtforms.validators import DataRequired

class LoginForm(FlaskForm):
    username = TextField('Username or Email', [DataRequired()])
    password = PasswordField('Password', [DataRequired()])
We can easily render the above form in the login template. Create the forms directory within the template directory. This directory will contain all the form templates. For now, create the login.html file and render the login form in it as follows.
<form method="post" class="form">
  <h3 class="form-heading">Login</h3>
  {{ form.username(class_ = 'form-control first-input',
      placeholder = form.username.label.text, required = true, autofocus = true) }}
  {{ form.password(class_ = 'form-control last-input',
      placeholder=form.password.label.text, required = true) }}
  <input
    type="submit"
    value="Submit"
    class="btn btn-primary btn-lg btn-block"
  />
</form>
Now, we need to define the XHR function that will send username and password to the Flask application, which will then log the user in via the API. Flask requires that a cross-site request forgery (CSRF) token be sent with each request.
To activate CSRF protection for your Flask application, call the CSRFProtect function with the Flask app as a parameter. Add the following lines to your app.py file to set this up.
app = Flask(__name__)
app.secret_key = "{your secret}"
csrf = CSRFProtect(app)
csrf.init_app(app)
Once we have activated the CSRF protection, we need to add the CSRF token to every form on the site that makes HTTP POST requests, or exclude it using the csrf_exempt decorator. In this case, we’ll inject the CSRF token before the login request is sent, using AJAX in the login.html file. Here’s what our final login file looks like.
{% extends 'layouts/main.html' %} {% block title %}Login{% endblock %}
{% block content %}
<script>
  $(document).ready(function () {
    $("form").submit(function (e) {
      var url = "{{ url_for('login') }}"; // send the form data here.
      $.ajax({
        type: "POST",
        url: url,
        data: $("form").serialize(), // serialize the form elements.
        success: function (data) {
          if (data.status === true) {
            sessionStorage.setItem("one-login-token",
              data.Data.token);
            $(location).prop("href",
              data.Data.next_url || "/post-token");
          } else {
            alert(data.Data.error_message);
          }
        },
        error: function (data) {
          alert(data.Data.error_message);
        },
      });
      e.preventDefault(); // block submission of the form.
    });

    // Inject our CSRF token into our AJAX request.
    $.ajaxSetup({
      beforeSend: function (xhr, settings) {
        if (
          !/^(GET|HEAD|OPTIONS|TRACE)$/i.test(settings.type) &&
          !this.crossDomain
        ) {
          xhr.setRequestHeader("X-CSRFToken",
            "{{ form.csrf_token._value() }}");
        }
      },
    });
  });
</script>
<form method="post" class="form">
  <h3 class="form-heading">Login</h3>
  {{ form.username(class_ = 'form-control first-input',
      placeholder = form.username.label.text, required = true,
        autofocus = true) }}
  {{ form.password(class_ = 'form-control last-input',
      placeholder=form.password.label.text, required = true) }}
  <input
    type="submit"
    value="Submit"
    class="btn btn-primary btn-lg btn-block"
  />
</form>
{% endblock %}
When the user clicks Login on the web page, the user credentials are sent to the Flask app, which then logs the user in via the API. If the login is successful, the OneLogin API will pass back a session token for the user.
Let’s create a second web page to redirect the user to upon successful login, and pass the session token to that page as a JavaScript variable. As soon as the page loads, we’ll make a CORS request to establish a session.
Create another HTML file under the forms directory and add the following code to it.
{% extends 'layouts/main.html' %} {% block title %} Post-Login {% endblock %}
{% block content %}
<script>
function makeCors() {
var url2 = "https://{your onelogin domain}/session_via_api_token";
var xhr = new XMLHttpRequest();
xhr.withCredentials = true;
method = "POST";
xhr.open(method, url2, true);
xhr.setRequestHeader("Content-Type", "application/json");
body = { session_token: sessionStorage.getItem("one-login-token") };
xhr.addEventListener("loadend", function () {
alert("SUCCESS");
});
xhr.send(JSON.stringify(body));
}
$(document).ready(function () {
makeCors();
});
</script>
<h3 class="form-heading">
Post Token Login
</h3>
<div class="container">
<h4 class="mb-0">
After success alert Click here to Go to
<a href="{your onelogin domain}"
>. You will be logged in.</a>
</h4>
</div>
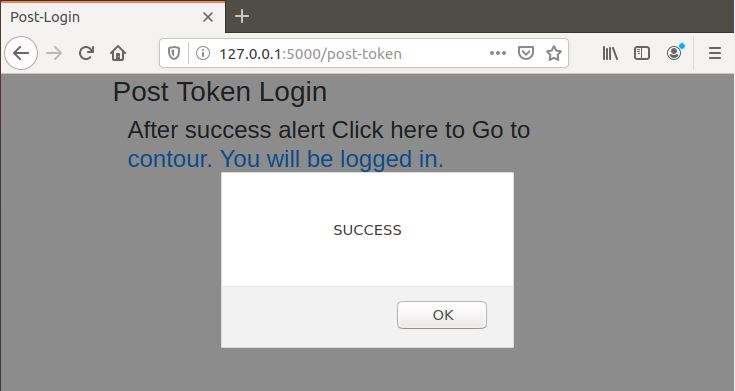
{% endblock %}Upon successful authentication, session cookies are set for OneLogin. If the request is unsuccessful, a CORS error is sent back to the client.
Authenticate User and Start Session
To run the sample application, we need to install packages into the pipenv virtual environment and update the Pipfile. Execute the pipenv install command from your project directory.
Activate the project’s virtualenv by executing the command pipenv shell.
And now run the application.
python app.py
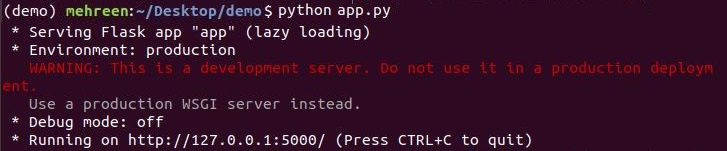
Navigate to http://127.0.0.1:5000/ and you should see this login page.
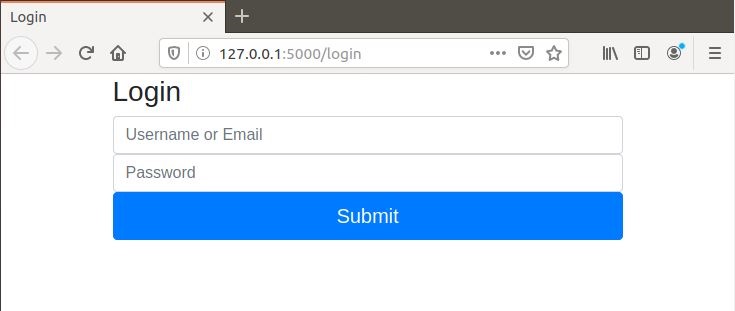
Enter the credentials of the user specified in OneLogin, and you will be automatically redirected after successful authentication.
Note that this flow works fine with browsers like Chrome or Firefox. Other browsers, such as Safari, make it harder to get this flow working unless you have a custom domain set up with OneLogin. This is due to increasing restrictions around cross-site tracking cookies. You can work around this by establishing a OneLogin session using a form post. This will be covered in a separate article.
Wrapping Up
In this article, you learned how to implement a custom authentication flow using the OneLogin API in just a few simple steps.
OneLogin simplifies the authentication process for developers and organizations, letting everybody focus on business logic rather than wasting time and resources on basic configurations.
We encourage you to experiment with the OneLogin API and see how it handles more complex authorization cases. Also, don’t hesitate to contact OneLogin experts to ask questions specific to your needs, or get a custom demo.
Have a Question?

Found a problem or a bug? Submit a support ticket.

Looking for walkthroughs or how-to guides on OneLogin's user and admin features? Check out the documentation in our Knowledge Base.

Have a product idea or request? Share it with us in our Ideas Portal.