Using the OneLogin API to Define Custom Access Tokens
Using the OneLogin API to Define Custom Access Tokens With the advance of the cloud, solid authentication and authorization mechanisms have become especially important for protecting data against unwanted access. Single sign-on (SSO) has come a long way — it makes management of users and applications easier than ever before. This is especially powerful when you use your SSO provider to issue access tokens to further extend the reach of SSO to your own, custom APIs.
OneLogin is a cloud-based identity and access management provider. Through its Unified Access Management platform, it enables organizations to securely manage user access for both cloud and on-premises applications using the SSO portal. With the OneLogin API, you can build powerful automated mechanisms that enable more scalable user management. This comes in handy as the number of applications and users in your organization grows.
In addition, the OneLogin API allows you to create and use custom Authorization Servers that can request access tokens for authenticated users. As you’ll see in this article, the Authorization Servers are created in just a few steps using the OneLogin Authentication Management API. Instead of building your own authorization server, with OneLogin you can consolidate your access management to a single location that is completely under your control. This allows you to implement token-based authorization reliably and fast.
This article will guide you through creating and using the Authorization Server step-by-step. We assume that you have knowledge of Python and authorization concepts. Follow the steps below to get started with the Authorization Server:
- Create an Authorization Server
- Add a claim and scope to the Authorization Server
- Add the Authorization Server to the OIDC app
- Get an access token
Prerequisites
To follow the steps in this article, you’ll need the following:
- A OneLogin account.
- An OIDC app created in your OneLogin account, with at least one user added to the app.
- Python installed (at minimum Python 3.6 because of the use of f-strings).
- OneLogin API credentials (a
client_idandclient_secret) with “Manage All” permissions.
Step 1: Create an Authorization Server
Let’s start by setting the variables that we’ll need to authenticate and communicate with the OneLogin API. (Note: Replace <subdomain> with your OneLogin subdomain.)
Set the
client_idandclient_secretthat we received as part of the API credentials.import requests import json domain = "<subdomain>.onelogin.com" client_id = "<client_id>" client_secret = "<client_secret>"Fetch a temporary access token that we can use to authenticate to the API.
response = requests.post(
    f"https://{domain}/auth/oauth2/token",
    headers={
        "Authorization": f"client_id:{client_id}, client_secret:{client_secret}",
        "Content-Type": "application/json",
    },
    json={
        "grant_type": "client_credentials"
    }
)

access_token = json.loads(response.text)['data'][0]['access_token']
Retrieve and set the access token for the API calls we’ll be executing. The following API call creates our Authorization Server.
response = requests.post(
    f"https://{domain}/api/2/api_authorizations",
    headers={
        "Authorization": f"Bearer {access_token}",
        "Content-Type": "application/json",
    },
    json={
        "name": "Test API",
        "description": "This is a test API",
        "configuration": {
            "resource_identifier": "https://example.com/contacts",
            "audiencies": "https://example.com/contacts",
            "access_token_expiration_minutes": 10,
            "refresh_token_expiration_minutes": 30
        }
    }
)

authorization_id = json.loads(response.text)['id']
We use an example resource identifier. The audience is typically the same as the identifier, you can also set more audiences to issue access tokens to be used against multiple APIs.
Note: We also set authorization_id, which we need to configure additional details.
Step 2: Add a Claim and Scope to the Authorization Server
Let’s add a claim and a scope to the Authorization Server.
A claim can be used to include additional custom information in the access token. This information will be accessible to everyone who gets their hands on the access token, so make sure you don’t expose sensitive information through these claims.
Scopes can be used to represent actions or access levels in APIs. Different actions may be allowed on the data that an API contains, such as reading or writing it. A token may receive only read permissions, only write, or both.
Another typical example is an “admin” scope, which would give administrative permissions to the token. It’s up to the API to verify that the access token contains the right scope to perform the requested action.
response = requests.post(
    f"https://{domain}/api/2/api_authorizations/{authorization_id}/claims",
    headers={
        "Authorization": f"Bearer {access_token}",
        "Content-Type": "application/json",
    },
    json={
        "name": "email_address",
    }
)

response = requests.post(
    f"https://{domain}/api/2/api_authorizations/{authorization_id}/scopes",
    headers={
        "Authorization": f"Bearer {access_token}",
        "Content-Type": "application/json",
    },
    json={
        "value": "custom:scope",
        "description": "A custom scope"
    }
)

scope_id = json.loads(response.text)['id']
Step 3: Add the Authorization Server to the OIDC App
Now we need to grant access to the OIDC app to generate access tokens for the Authorization Server. To do so, we need to know the ID of the app. This is easily found by opening the app in your browser: the ID is right there, in your URL bar. Using this ID, we can now connect the Authorization Server to the OIDC app.
app_id =

response = requests.post(
    f"https://{domain}/api/2/api_authorizations/{authorization_id}/clients",
    headers={
        "Authorization": f"Bearer {access_token}",
        "Content-Type": "application/json",
    },
    json={
        "app_id": app_id,
        "scopes": [scope_id]
    }
)
We also pass the scope that we created earlier: at least one scope the app can request is required.
Step 4: Get an Access Token
With all the pieces configured, we can now request a token for the user connected to the OIDC app. You’ll need the following details to execute this API call:
- The username and password for the user.
- The
client_idandclient_secretvalues for the OIDC app (found on the SSO tab of your app).
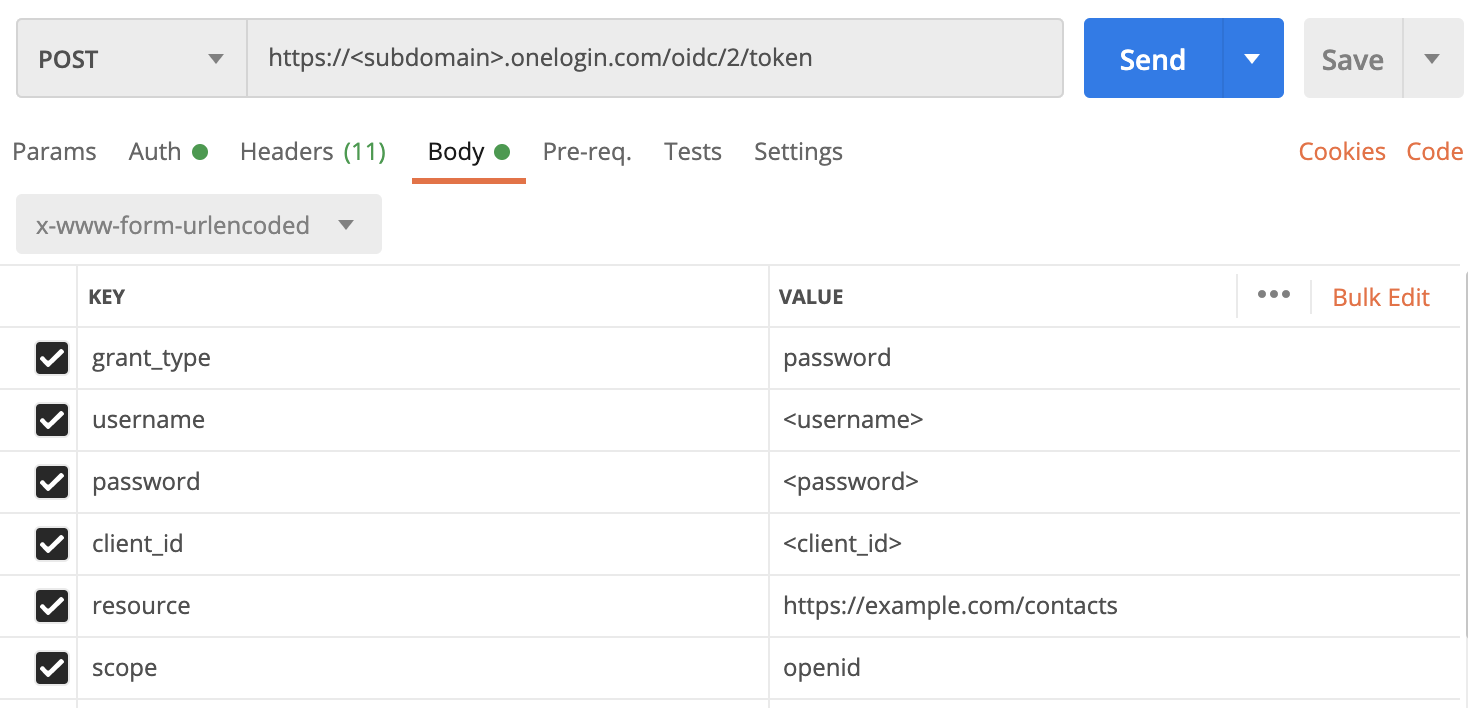
Spin up your favorite API client (mine is Postman). You can also use
curlor the Pythonrequestsmodule. We’ll use the Password Grant API flow to request a token for our user.The URL that we execute this request on is:
https://<subdomain>.onelogin.com/oidc/2/tokenSet the following headers:
- Content-Type:
application/x-www-form-urlencoded - Authorization:
Basic <base64 encoded "client_id:client_secret">
- Content-Type:
In the request body, set the following parameters:
- grant_type:
password - username: username of your user
- password: password of your user
- client_id:
client_idof your OIDC app - resource:
https://example.com/contacts(set on Authorization Server creation) - scope:
openid
This request will return a JSON body that contains the access token.
- grant_type:
Verify this access token to double-check it contains all the information we expect using the introspection endpoint on the OneLogin API:
https://<subdomain>.onelogin.com/oidc/2/token/introspectionSet the same headers as before. In the request body, set your access token with the
tokenparameter.
This request returns the unpacked token, including information such as the expire time, issuer, and the issuing authority.
Wrapping Up
Expected it to be more complex? No: that’s it!
In this article, we walked through using the OneLogin API Authorization APIs to create an Authorization Server for authenticating users and generating access tokens. Your authenticated users can use these to call your own APIs.
The scenario we considered was pretty basic. We encourage you to experiment with the OneLogin API to learn how it can handle more complex use cases. Also, don’t hesitate to contact the OneLogin experts to ask questions or to get a custom demo.
Have a Question?

Found a problem or a bug? Submit a support ticket.

Looking for walkthroughs or how-to guides on OneLogin's user and admin features? Check out the documentation in our Knowledge Base.

Have a product idea or request? Share it with us in our Ideas Portal.