Django Authentication with OneLogin
Django is one of the most widely deployed frameworks in the Python ecosystem. However, the Django authentication system was intended primarily as a stand-in and hasn’t aged as well as other components in that framework. This article looks at how you can implement a much more sophisticated single-sign-in (SSO) authentication system with a few lines of Python.
Understanding Django and Its Authentication Limitations
Django is well-known for including a large suite of tools to handle areas as diverse as HTTP communication, session state, object-relational mapping (ORM), and authentication. However, Django’s authentication system is fairly simple and might not cover all authentication and authorization use cases a modern web application needs to handle.
Moreover, handling authentication yourself can be a liability. Do you really want to be responsible for building a web application and ensuring that your users’ credentials can’t be stolen if your database is compromised?
Improving Django Authentication with OneLogin’s OpenID Connect Platform
OneLogin OpenID Connect is an SSO authentication service designed to work with a variety of different web and application platforms. It takes advantage of the OpenID Connect (OIDC) standard — the successor to OpenID — to provide authentication through the exchange of verification tokens. This means that rather than requiring that someone use a separate username and password to log into each OIDC application, they need only log into one OIDC application.
You’ve likely seen this in action before if you’ve visited a website that lets you sign in using your Google or Facebook account. What we’ll be doing is similar, except we’ll have control over the OpenID Connect application we create on OneLogin. We’ll be able to sign into the OneLogin dashboard to view and manage our users, roles, and applications.
Prerequisites
Experience working with Django and have a working Django app to which you want to add OIDC authentication.
You’ve followed the steps to create an OIDC application on OneLogin.
Getting Started
Once you’ve created the application, there are a couple of settings you’ll need to change to work with Django.
Since you’re likely running Django locally during development, add
http://localhost:8000/oidc/callbackto the Redirect URIs box on the Configuration tab of your OneLogin app’s admin screen: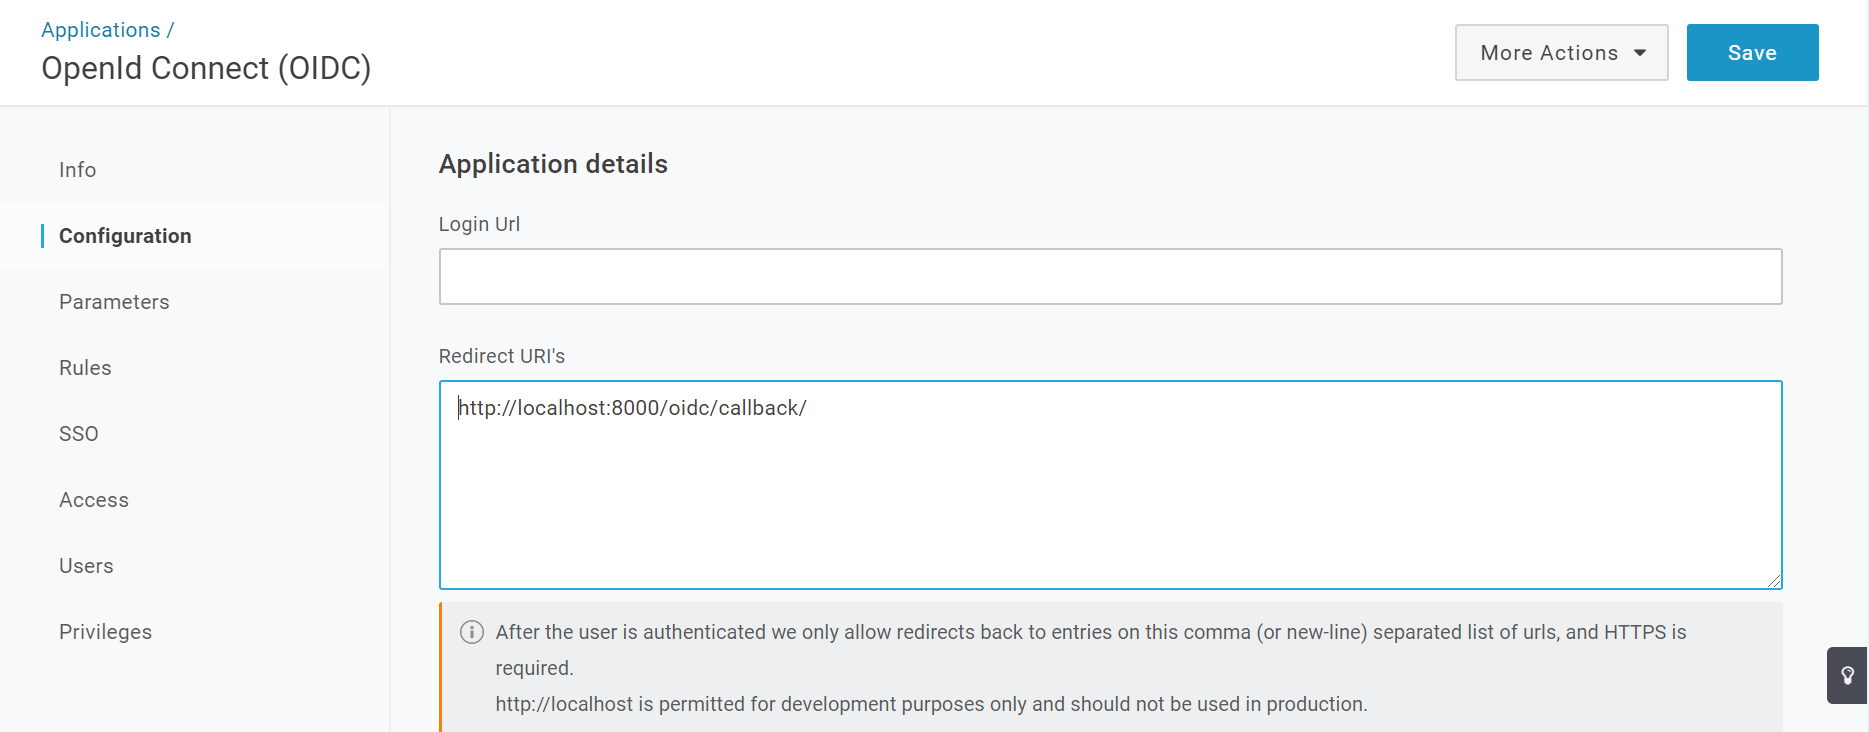
Your Django application’s redirect URI will always end with
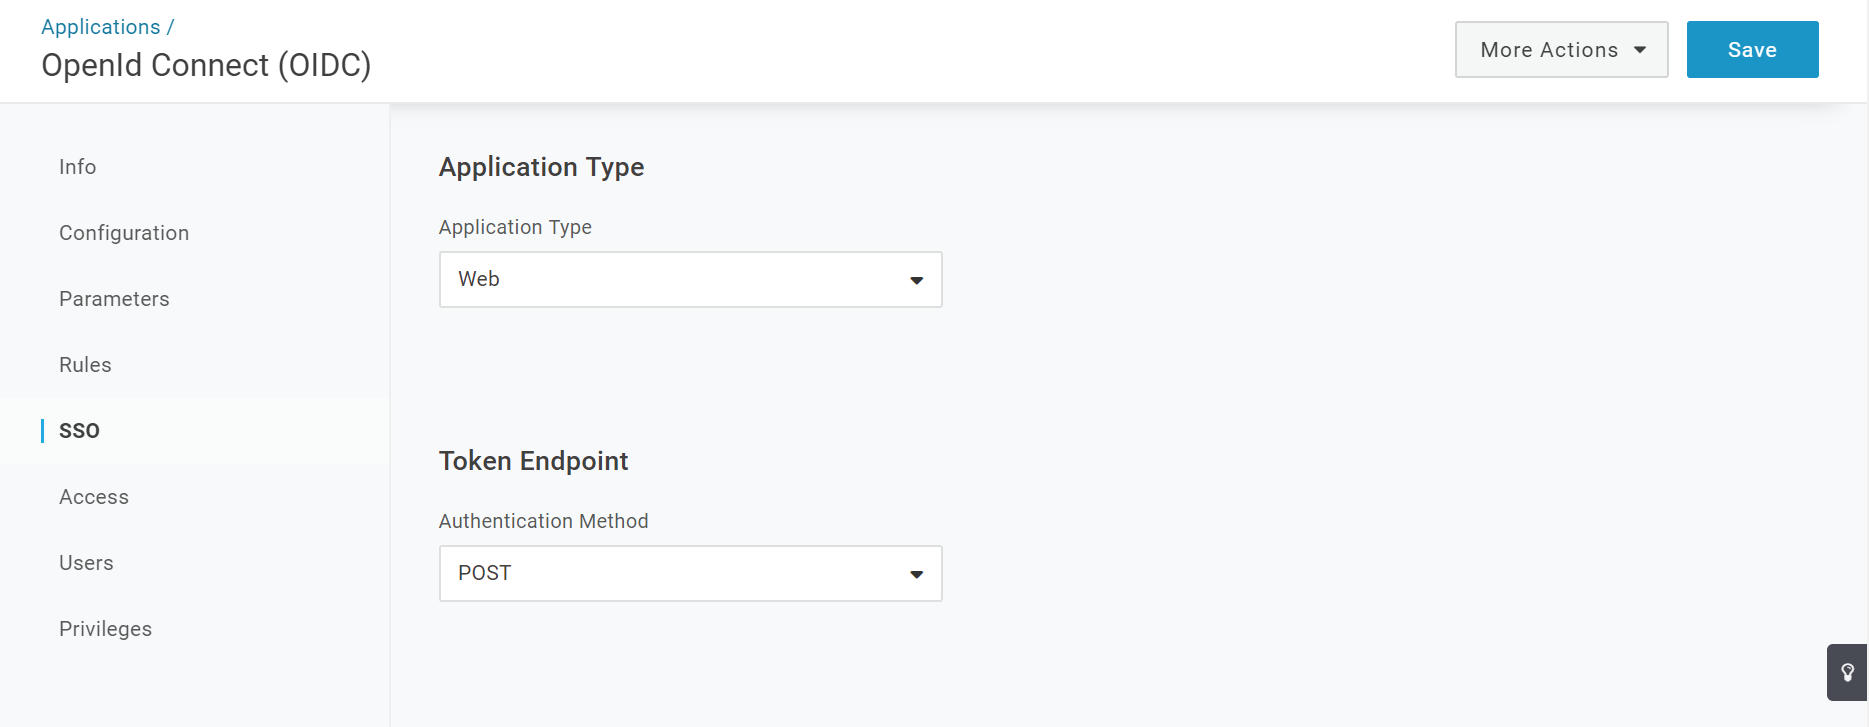
/oidc/callback/. So, if your Django app will run in production athttps://myapp.com, you’d want to addhttps://myapp.com/oidc/callback/to the list of redirect URIs.On the SSO tab under Token Endpoint, change Authentication Method to POST:
And that’s it — your OpenID application is ready to use.
Adding OpenID Connect Authentication to Django
Now for the fun part: adding OIDC to our Django app. To make things simple, we’ll use the mozilla-django-oidc library. It handles all of the difficult parts of OIDC integration so we can add it to our application quickly and easily.
Start by installing the library with pip, using the following command:
pip install mozilla-django-oidc
When the installation finishes, we’re ready to start using the library.
As you probably know, all Django apps contain a top-level project with several configuration files. To integrate OIDC into our application, we’ll need to make changes to settings.py and urls.py.
Let’s start with settings.py. We need to modify and set several variables to tell Django to use the Mozilla OIDC library, and to provide the library the information it needs to talk to our OneLogin OIDC app.
Add the Mozilla library to our list of installed apps. To do this, add
mozilla_django_oidcto theINSTALLED_APPSarray. Make sure you add it after django.contrib.auth. This is important because the Mozilla library extends Django’s built-in authentication, so the Django authentication app must be loaded before the Mozilla OIDC app.INSTALLED_APPS = [ 'django.contrib.admin', 'django.contrib.auth', 'mozilla_django_oidc', 'django.contrib.contenttypes', 'django.contrib.sessions', 'django.contrib.messages', 'django.contrib.staticfiles', 'testapp' ]Add a variable that tells Django to use the Mozilla OIDC authentication back end:
AUTHENTICATION_BACKENDS = (
    'mozilla_django_oidc.auth.OIDCAuthenticationBackend',
)
Now we’ll set up several libraries to tell the OIDC library how to talk to our OneLogin app.
Set variables to provide our app’s client ID and client secret:
OIDC_RP_CLIENT_ID = 'YOUR CLIENT ID'
OIDC_RP_CLIENT_SECRET = 'YOUR CLIENT SECRET'
You’ll need to use your own client ID and client secret values. You can find these values at the top of the SSO tab of your OneLogin OIDC application’s admin panel.
Ideally, you should never save these values in your source code. It’s best to set them as environment variables on the servers where your Django app will be running and then load them into your app. That way, the security of your OneLogin OIDC application won’t be compromised if your Django application’s source code is stolen.
Add several endpoint URLs the Mozilla OIDC library needs to know to communicate with OneLogin:
OIDC_OP_AUTHORIZATION_ENDPOINT = "https://myapp.onelogin.com/oidc/2/auth"
OIDC_OP_TOKEN_ENDPOINT = "https://myapp.onelogin.com/oidc/2/token"
OIDC_OP_USER_ENDPOINT = "https://myapp.onelogin.com/oidc/2/me"
Note: the subdomain of your endpoints won’t be myapp. Instead, use the subdomain you created when you set up your OneLogin account.Tell the OIDC library which signing algorithm to use, and provide the endpoint where it can find the signing certificates:
OIDC_RP_SIGN_ALGO = "RS256"
OIDC_OP_JWKS_ENDPOINT = "https://contentlab-dev.onelogin.com/oidc/2/certs"
Add redirect URLs where users will be sent after logging in or out of our app:
LOGIN_REDIRECT_URL = "http://localhost:8000/testapp"
LOGOUT_REDIRECT_URL = "http://localhost:8000/testapp"
You’ll want to change these to match your application’s functionality. For example, you might want to redirect users to a dashboard after login, and after logout you may want to show a page telling the user they’ve successfully signed out.
That’s it for
settings.py.Add one line to urls.py now, to integrate the Mozilla library’s OIDC endpoints:
from django.urls import include, path, re_path

urlpatterns = [
    path('testapp/', include('testapp.urls')),
    path('admin/', admin.site.urls),
    re_path(r'^oidc/', include('mozilla_django_oidc.urls'))
]
As you can see, we’ve added one line of code to the end of the
urlpatternsarray. Note: you may need to addre_pathto your imports if you haven’t imported it already.
And that’s it! With just a few lines of code, we’ve enabled OIDC authentication in our application.
Next, we’ll take a quick look at how to add an OIDC login to our Django’s application’s HTML templates, and we’ll read some of the role and claim data OneLogin provides for the signed-in user.
Login Templates
Now that we’ve added OIDC support behind the scenes, how do we actually use it to sign users into our Django app?
Fortunately, the Mozilla OIDC library includes helpers we can call directly from our Django templates. Let’s look at an example of how we’d add a login link and a logout button to one of our pages:
<div>
{% if user.is_authenticated %}
 <p>Current user: ❴❴ user.email ❵❵</p>
 <form action="{% url 'oidc_logout' %}" method="post">
     {% csrf_token %}
     <input type="submit" value="Logout">
 </form>
 {% else %}
 <a href="{% url 'oidc_authentication_init' %}">Login</a>
 {% endif %}
</div>
Here, if the user is authenticated, we show their email address and a logout button. If they’re not authenticated, we show them a login link.
The key parts to understand are the oidc_authentication_init and oidc_logout URL helpers. You can use these anywhere, in any of your application’s HTML templates to generate login and logout links.
In this case, if the user clicks the Login button, they’ll be sent to OneLogin and asked to sign in. If they complete the sign in successfully, they’ll be seamlessly redirected back to your Django application.
Conclusion
And we’re done! In just a few easy steps, we added OneLogin OpenID Connect authentication to a Django application.
Authentication in Django (or any other platform) doesn’t have to be complicated to be robust. OneLogin’s OpenID Connect API is a powerful tool that simplifies building single-sign-on and multi-factor authentication into your applications.
By taking advantage of Django’s native ORM capabilities and Python’s ease of use, OneLogin makes SSO apps easy to create. Don’t hesitate to contact our experts to help you get started.
Have a Question?

Found a problem or a bug? Submit a support ticket.

Looking for walkthroughs or how-to guides on OneLogin's user and admin features? Check out the documentation in our Knowledge Base.

Have a product idea or request? Share it with us in our Ideas Portal.