kevin.creason | March 16th, 2021
One of the hot features that OneLogin offers is an HRIS-driven workflow that onboards employees from the HRIS solution into OneLogin and includes provisioning into Active Directory from OneLogin. A common ask for an export-mode Active Directory instance is to perform additional tasks after the user has been created. One standard request is to immediately add the new user to an AD security group necessary for their job function, much like we immediately add to OneLogin Roles. These extra steps are too unique to a customer’s environment to be easily addressed in the OneLogin provisioning engine or Active Directory Connector software, but they can often be accomplished through PowerShell commandlets. PowerShell can access the user object in Active Directory easily enough, the only pieces missing - the answers to the question “which user and what are their user details?” - can be answered through the OneLogin API interface.
This article describes the events and API calls necessary to find out which user and what are their details and provide you with some sample Windows commands to feed your creative process.
The script this article builds is written so you can use the Windows scheduler to run the script in a task once a day to update accounts newly created in your AD by OneLogin or as you see fit.
I will attempt to spice up this otherwise dry topic of marrying PowerShell and OneLogin API with a few memes or other relevant social cues.
Active Directory Added to their Story
“A user was added to Active Directory” is so boring! The event is much more exciting than that statement conveys — we are automatically provisioning new accounts to AD for you! That’s a big story already!
So let’s think of this event in terms of an update in Social media. You need notifications about the story.

Fortunately, there are events in OneLogin to help you read the story. You could read the article in our knowledge base about Reporting and Monitoring but it barely scratches the surface. The Developers site article Event Resource and Types is a better resource on what is told in the story.
Note: The events list is a growing list. It expands as we expand our functionality. You may want to regularly review the Developers site.
Event Resource and Types contains the one you are interested in:
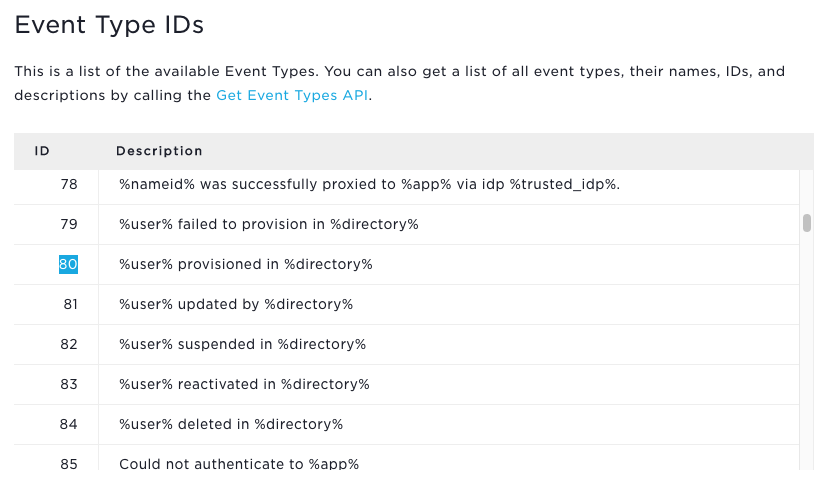
Event #80: User provisioned in directory
This event is recorded in OneLogin after the user has been successfully created in the directory. This is what you want to look for, but if you fire that off now it will show the matching event potentially going back years, so you need to put a limit by specifying when you want it to look.
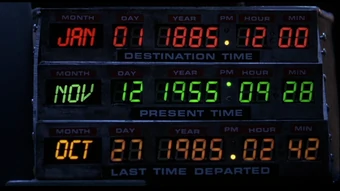
Not that any of these dates would be valid…
Let us begin by looking at the API endpoint that you will call.
The Get Events API endpoint specifies a query string that limits the results returned. You can use three options of the query_string to limit our results to just the appropriate events:
- Event_type_id
- Since
- Until
Note: You can also get away with only two fields if you want to leave “until” unspecified; it will use the exact time of the query. For a more precise approach, specify Until.
The Developers Get Events resource provides excellent documentation on doing exactly what you want. The examples in the page provide some detailed tutorials on fetching particular events by specific event type and limited by time. We’ll build off those examples with simple modifications.
The challenge is doing it all in PowerShell, so let’s get started.
Playing with Time
The time format required for the API endpoint needs to be in the Coordinated Universal Time (UTC) ISO8601 format. This looks like:
- 2021-02-25T00:35:46.697Z
In simple terms, that is:
- Four digit year
- Hyphen two-digit month
- Hyphen two-digit day of the month
- “T” (capital t)
- Two-digit hour in UTC
- Colon two-digit minutes
- Colon two-digit seconds
- Period three-digit microseconds
- Z (for UTC)
Look tough? Does it look like you need a Doctor or Time Lord?

No Doctor needed!
PowerShell makes this somewhat easy to calculate and specify the format exactly. You use the Hours parameter to instruct PowerShell to subtract however many hours we need subtracted from the time this runs and then convert the resulting calculated time to the exact format you need using this line:
$start = [DateTime]::Now.AddHours(-$Hours).ToUniversalTime().ToString("yyyy-MM-ddTHH:mm:ss.fffZ")And just like that, we turned back time.
If you wish to log the time the command runs to the screen or to a logfile, populate additional variables too.
$now = [DateTime]::Now.ToString("yyyy-MM-ddTHH:mm:ss.fffz")
$utcnow =  [DateTime]::Now.ToUniversalTime().ToString("yyyy-MM-ddTHH:mm:ss.fffZ")
$start = [DateTime]::Now.AddHours(-$Hours).ToUniversalTime().ToString("yyyy-MM-ddTHH:mm:ss.fffZ")
PowerShell Sends Friend Request
The most daunting task is getting PowerShell and the OneLogin API endpoints on speaking terms.
You will need Read Users API credentials to perform this operation, which is the lowest permission credential that can perform the tasks necessary.
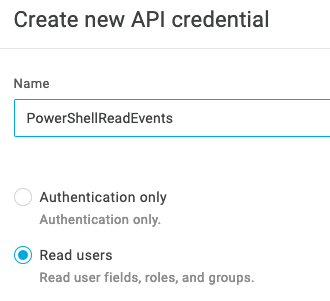
These credentials can be saved as variables in the script or passed in via command line options during execution. They will be used to obtain an Access Token from the API endpoint for authentication so you can call the other APIs to obtain events and user information.
The script example will have you define these in a param section, which allows you to actually store blank variables in the script (if you prefer for security’s sake) and provide the specific variables necessary at runtime via the command line options. (Note: Replace <subdomain> with your OneLogin subdomain.)
param (
    # Set debug level
    [int]$debug = "3",


    # Set Hours Between run
    [int]$Hours = "99",


    # EventIds: 80 = User provisioned to directory
    [string]$EventId = "80",

    # APIhost
    $APIhost ="<subdomain>.onelogin.com",

    # Creds
    $APIclientid = "therespineappleshrimplemonshrimpcoconutshrimppeppershrimpshrimpsoup",

    $APIclientsecret = "shrimpstewshrimpsaladshrimpandpotatoesshrimpburgershrimpsandwich"

  )
A few other things in the param section that are optional but nicely handled using this mechanism:
- Debug level
- Hours
- EventID
- API host
The API Host and the API secrets are used to obtain the Access Token as we mentioned. Here’s the PowerShell code:
# Get the access token from API credentials
$Headers = New-Object "System.Collections.Generic.Dictionary[[String],[String]]"
$Headers.Add("Content-type","application/json")
$Headers.Add("Authorization","client_id`:$APIclientid,client_secret:$APIclientsecret")
$Body = '{"grant_type":"client_credentials"}'
$access_token = (Invoke-restmethod  -URI "https://$APIhost/auth/oauth2/v2/token" -Method "Post" -Headers $Headers -Body $Body ).access_token

The Invoke-restmethod commandlet from PowerShell is used because it understands the JSON response. From there it is simple to specify which element of the response from the API endpoint is the Access Token that is needed.
The rest of the buildup to the Invoke-RestMethod commandlet is defining the Headers for the request.

Once the Access Token is populated, you are ready to reformulate the Headers for the next request(s). These headers will specify the Access Token for authentication.
$Headers = New-Object "System.Collections.Generic.Dictionary[[String],[String]]"
$Headers.Add("Authorization","Bearer $access_token")
$Headers.Add("Content-type","application/json")
PowerShell Follows Events@OneLogin
Everything is coming together, and you are ready to have AD start following OneLogin.

We are now armed with an Access Token in our Headers, the Event ID number we want to see, and we have an appropriate Start Time calculated. We begin by pulling this all together with this line of code:
$Result = (Invoke-RestMethod -Uri "https://$APIhost/api/1/events?event_type_id=$EventID&since=$start" -Method "GET" -headers $Headers ).data.user_idThis will create an array called “Result” that contains the OneLogin User IDs provisioned to a directory.
This would be sufficient if you stored the OneLogin ID number in Active Directory - you could do an AD lookup to find the user if that were true- but most people probably don’t. So let’s prepare a second OneLogin API endpoint to get user details for each particular user ID.

You cannot gather User details directly. There needs to be a condition that makes sure there is something that looks like a UserID from the request. We’ve already done that with the Invoke-Webrequest JSON processing where only the user_id is returned from the data. If it does not find user_id in the data, then our Result will be empty. So in other words, in our script if the “Result” array is not null, the script will proceed and begin a loop of each element in that array.
# simple method to skip if no results
if (! $Result -eq "" )
{
 # iterating through the events/user_id
  $count = 1 #just for debug output
  $Result | %{
    if ($Debug -gt 0) { write-output " Entry $count is user id : $_" }
Now the script can safely call our next API endpoint to get one particular user’s details.
$UserDetails = Invoke-RestMethod -Uri "https://$APIhost/api/2/users/$_ " -Method "GET" -headers $Headers
     if ($Debug -gt 2) {write-output "Dump the UserDetails: $UserDetails" }
The UserDetails array is populated by Invoke-RestMethod parsing the JSON output of the endpoint for us. I recommend extracting out particular user attributes into easy-to-reference attributes. This step is optional, but recommended for clarity and debugging.
# Extract the user attributes that we need in logic sections or user actions below
     # Also add them to the Clear-Variable section at the end of section for safety
     $SAM = $UserDetails.samaccountname
     $UPN = $UserDetails.userprincipalname
     $GN=$UserDetails.firstname
     $SN=$UserDetails.lastname
     $Email=$UserDetails.email
     # Custom User Fields require a little extra step
     $CUF = $UserDetails.custom_attributes
     $UserType = $CUF.user_type
PowerShell Powers Up - You won’t believe what happens next!
Once you analyze which user attributes you need, you can proceed to performing the necessary actions on the user, i.e. you can now perform precise actions using secondary logic based on the user variables.
Yeah, you probably can believe what happens next! There is probably a PowerShell commandlet to do it. You just needed the event and the API authentication pieces above.
Some ideas -
- Add Groups to users. Use the group shortname and use the Add-AdPrincipalGroupMembership commandlet
- Create mailbox in on-prem Exchange system — use the Enable-Mailbox commandlet for Exchange.
#Add Groups
Add-AdPrincipalGroupMembership -Identity $UserSAM -Memberof thisgroup
#Create Mailbox
Enable-Mailbox -Identity $UPN
Once you have completed your commands, but before you close the per-user loop, use a Clear-Variable to unset any user attributes you used for these commands.
Clear-Variable -name UserDetails,CUF,SAM,GN,Email,SN,UPN,UserType
     $count =$count+1
So where will you go with this?

Script Sample
Be cautious with quotes when copying from here. They are often converted improperly after going from PowerShell script to text, to online editor, to blog.
<#
.SYNOPSIS
This should run on a regular schedule. Adjust the time so that it matches the HR Directory sync.
It will check events for the event "User provisioned in directory"

Expand the fields that we retrieve from OneLogin that you need for programmatic action (user_type, job_code, location)

The CMD section will be commands you want to run on these users.

.DESCRIPTION
Run commands on new users after they provision from OneLogin to the AD

.PARAMETER debug
Specify the debug level, 0 (none), 1, or 2

.PARAMETER EventID
The Event we monitor for. This should be Event ID 80, or user provisioned in directory

.PARAMETER Hours
How many hours do we look at for the event? How far apart are you scheduling this tool?

.PARAMETER APIclientid


.PARAMETER APIclientsecret

.PARAMETER APIhost
The API hostname (switch between US and EU, etc)

.EXAMPLE
PS> scriptname -APIclientid zaphodbeeblebroxforpresident -APIclientsecret arthurdentmightobject

#>

param (
    # Set debug level
    [int]$debug = "3",

    # Set Hours Between run
    [int]$Hours = "99",

    #  EventIds: 80 = User provisioned to directory
    [string]$EventId = "80",

    # APIhost
    $APIhost ="<subdomain>.onelogin.com",

    #Creds
    $APIclientid ="",
    $APIclientsecret=""

  )

$now = [DateTime]::Now.ToString("yyyy-MM-ddTHH:mm:ss.fffz")
$utcnow =  [DateTime]::Now.ToUniversalTime().ToString("yyyy-MM-ddTHH:mm:ss.fffZ")
$start = [DateTime]::Now.AddHours(-$Hours).ToUniversalTime().ToString("yyyy-MM-ddTHH:mm:ss.fffZ")

# Speed Up the Invoke-RestMethod:
$ProgressPreference = 'SilentlyContinue'

if ($Debug -gt 0) { write-output "Script begins at: $now, UTC $utcnow.
  The filter time for event is: $start"
}

# Get the access token from API credentials
$Headers = New-Object "System.Collections.Generic.Dictionary[[String],[String]]"
$Headers.Add("Content-type","application/json")
$Headers.Add("Authorization","client_id`:$APIclientid,client_secret:$APIclientsecret")
$Body = '{"grant_type":"client_credentials"}'
$access_token = (Invoke-restmethod  -URI "https://$APIhost/auth/oauth2/v2/token" -Method "Post" -Headers $Headers -Body $Body ).access_token

# optional log for super major debug
if ($debug -gt 4) { write-output " Access token: $access_token" }

$Headers = New-Object "System.Collections.Generic.Dictionary[[String],[String]]"
$Headers.Add("Authorization","Bearer $access_token")
$Headers.Add("Content-type","application/json")

# For more precision, also calculate an Until time and include here as &until=$until
$Result = (Invoke-RestMethod -Uri "https://$APIhost/api/1/events?event_type_id=$EventID&since=$start" -Method "GET" -headers $Headers ).data.user_id

# simple method to skip if no results
if (! $Result -eq "" )
{
     # iterating through the events/user_id
     $count = 1 #just for debug output
     $Result | %{
     if ($Debug -gt 0) { write-output " Entry $count is user id : $_" }

     # Get User Details
     $UserDetails = Invoke-RestMethod -Uri "https://$APIhost/api/2/users/$_ " -Method "GET" -headers $Headers
     if ($Debug -gt 2) {write-output "Dump the UserDetails: $UserDetails" }

     # Extract the user attributes that we need in logic sections or user actions below
     # Also add them to the Clear-Variable section at the end of section for safety
     $SAM = $UserDetails.samaccountname
     $UPN = $UserDetails.userprincipalname
     $GN=$UserDetails.firstname
     $SN=$UserDetails.lastname
     $Email=$UserDetails.email
     # Custom User Fields require a little extra step
     $CUF = $UserDetails.custom_attributes
     $UserType = $CUF.user_type
     if ($DEBUG -gt 0) { write-output "   User's sAMAccountName is $SAM, UPN=$UPN, DisplayName is $GN $SN, email $Email" }

     # Run Commands on user
      #Add Groups
      # Add-AdPrincipalGroupMembership -Identity $UserSAM -Memberof thisgroup

      #Create Mailbox
      # Enable-Mailbox -Identity $UPN

      # New-RemoteMailbox -UserPrincipalName $UPN -Alias $SAM -PrimarySmtpAddress $email -Name $SAM -Password $p -FirstName "$GN" -LastName "$SN" -DisplayName "$GN $SN" -ResetPasswordOnNextLogon $false
      # start-sleep 30
      # Set-RemoteMailbox -Identity $UPN -EmailAddresses $Email


     Clear-Variable -name UserDetails,CUF,SAM,GN,Email,SN,UPN,UserType
     $count =$count+1
   }
 }

Kevin Creason is one of our Senior Implementation Consultants and is also known for his coffee problem. The phrase “coffee snob” has been used but mostly he just loves roasting his own beans and using one of his 13 different brewing devices.