erik.talvi | February 7th, 2023
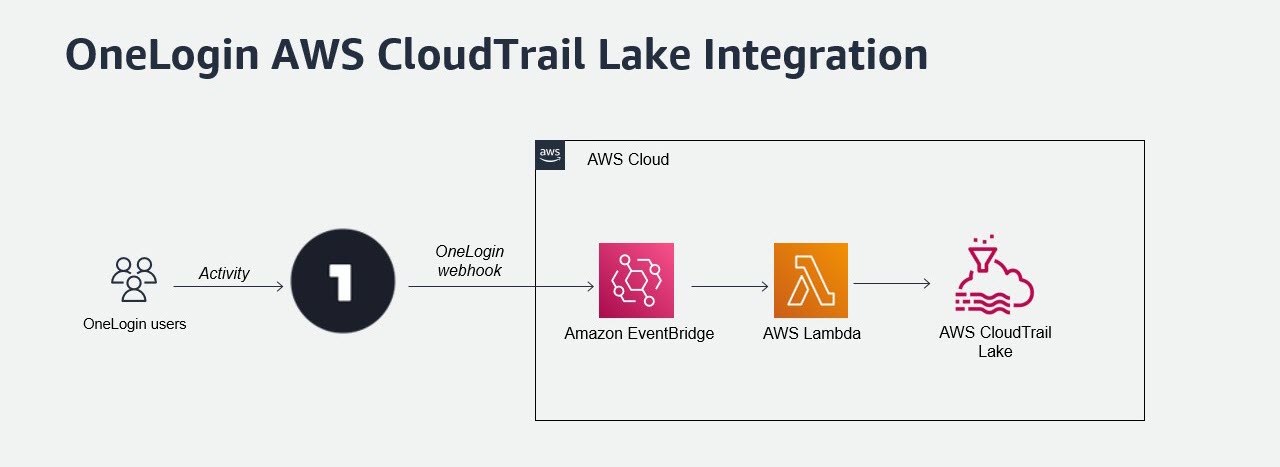
One Identity is an integration partner with the new CloudTrail Lake service from Amazon Web Services (AWS). When OneLogin users generate activity within our platform, OneLogin can send event data via a predefined webhook to AWS EventBridge, which then triggers a lambda rule to store the event log in CloudTrail Lake. In this blog post, I’ll walk you through how to create this integration between your One Identity OneLogin tenant and AWS CloudTrail Lake.
Before we begin, you’ll need to know your AWS account number and to decide how long your event store should retain events (up to 7 years). As we go, you’ll be naming a lot of new tools that you’ll reuse throughout the course of this process, so it’s a good idea to plan these identifiers in advance. I’ve listed the names that I used here, and will highlight them through the rest of this post so you know where to substitute your own.
| Identifier | Example |
|---|---|
| AWS CloudTrail Lake Event Store | onelogin-event-data-store |
| AWS Event Store Channel | onelogin-event-channel |
| AWS IAM Lambda Policy | LambdaCloudTrailLakePolicy |
| AWS IAM Lambda Role | lambda-cloudtraillake-role |
| AWS EventBridge Rule | onelogin-events |
| AWS Lambda Function | OneLoginCloudTrailLakeConnector |
| OneLogin EventBridge Webhook | CloudTrailLake-Connector |
Let’s get started!
Step 1: Create the CloudTrail Lake Event Data Store and Channel in AWS
In your AWS Management Console, use the search bar to navigate to CloudTrail, then select Event data stores in the Lake feature.
Select Create event data store and name it onelogin-event-data-store.
- Select your preferred retention period.
- For Event types, choose Events from integration.
- Select One Identity as your source.
- Enter your event channel name.
Select your new event data store and copy the value in the Channel Arn field for later reference. It should look something like this:
arn:aws:cloudtrail:us-east-1:123456789012:channel/3f212354-317c-4209-9341-631210ebc1aa
Step 2: Create the necessary roles and policies in AWS
Create an IAM policy with JSON like this:
{
    "Version": "2012-10-17",
    "Statement": [
        {
            "Effect": "Allow",
            "Action": [
                "cloudtrail:CreateEventDataStore",
                "cloudtrail:UpdateEventDataStore",
                "cloudtrail:DeleteEventDataStore",
                "cloudtrail:ListEventDataStores",
                "cloudtrail:RestoreEventDataStore",
                "cloudtrail:GetEventDataStore",
                "cloudtrail:StartQuery",
                "cloudtrail:ListQueries",
                "cloudtrail:CancelQuery",
                "cloudtrail:DescribeQuery",
                "cloudtrail:GetQueryResults",
                "cloudtrail:CreateChannel",
                "cloudtrail:UpdateChannel",
                "cloudtrail:DeleteChannel",
                "cloudtrail:GetChannel",
                "cloudtrail:ListChannels",
                "cloudtrail:PutResourcePolicy",
                "cloudtrail:GetResourcePolicy",
                "cloudtrail:DeleteResourcePolicy"
            ],
            "Resource": "*"
        },
        {
            "Effect": "Allow",
            "Action": "cloudtrail-data:PutAuditEvents",
            "Resource": "*"
        },
        {
            "Effect": "Allow",
            "Action": [
                "iam:ListRoles",
                "iam:GetRolePolicy",
                "iam:GetUser"
            ],
            "Resource": "*"
        },
        {
            "Effect": "Allow",
            "Action": [
                "logs:CreateLogStream",
                "logs:CreateLogGroup"
            ],
            "Resource": "arn:aws:logs:*:711520095505:log-group:*"
        },
        {
            "Effect": "Allow",
            "Action": "logs:PutLogEvents",
            "Resource": "arn:aws:logs:*:711520095505:log-group:*:log-stream:*"
        },
        {
            "Effect": "Allow",
            "Action": "iam:PassRole",
            "Resource": "*",
            "Condition": {
                "StringEquals": {
                    "iam:PassedToService": "cloudtrail.amazonaws.com"
                }
            }
        }
    ]
}
Next, create a role to use for your lambda function:
- For Trusted entity type, select AWS Service.
- For Use case, select Lambda.
- Check the box to add your newly created policy to the role.
- Name your role lambda-cloudtraillake-role.
Step 3: Create the Lambda Function in AWS
Choose Create function in the AWS Lambda console. For this step, I’m going to send you over to Amazon’s excellent guide, Create a Lambda function with the console. Use these options as you go:
- Author: from scratch
- Function: OneLoginCloudTrailLakeConnector
- Runtime: Ruby 2.7
- Architecture: arm64
- Change the default execution role to Use an existing role and select lambda-cloudtraillake-role.
Once you create the Lambda, you can deploy the code by selecting Upload from, then choosing Amazon S3 Location and entering this URL:
https://onelogin-screenshots.s3.amazonaws.com/dev_site/OneLoginCloudTrailLakeConnector.zipIn Lambda’s Configuration tab, select Environment variables on the left and choose Edit to add these variables:
aws_account_id Enter your organization’s AWS account ID. aws_channel_arn Paste in the Event Channel ARN you copied earlier while we were creating the event data store.
Step 4: Create the EventBridge Webhook in OneLogin
To create this webhook, it’s time again to reference another guide, this time OneLogin’s own Stream OneLogin Event Data to Amazon EventBridge.
Once you’ve completed that process, verify that the webhook can be seen in the OneLogin Event Broadcaster’s list.
Select the newly created broadcaster and verify the Event Source value from the edit screen. It should look like
aws.partner/onelogin.com/US-205033/061112e9cb, with your webhook’s own ID in the marked portion.
Step 5: Attach the EventBridge trigger to the Lambda Function
In your AWS EventBridge management portal, go to Integration > Partner event sources.
Select your event source value from Partner event sources.
Select Associate with event bus and go to Buses > Rules.
In Event bus, select your ID and choose Create rule.
In Build event pattern, go to Event Source and select AWS events or EventBridge partner events.
Go to Creation Method and select Use pattern form.
Go to Event pattern and select:
- Event source: EventBridge partners
- Partner: OneLogin
- Event Type: All Events
Choose Next.
In Select target(s), create two targets. To create the second target, select Add another at the bottom:
Target 1 – for EventBridge logging Target types AWS service Select a target CloudWatch log group Log group /aws/events/eventbridge-oneloginTarget 2 – to connect to your Lambda function Target types AWS service Select a target Lambda function Function OneLoginCloudTrailLakeConnector Review and Save your settings.
Step 6: Test your configuration
We’re almost done! The last thing we need to do is make sure that the events your users’ activity generates through OneLogin are being forwarded through the AWS services you configured and posted CloudTrail Lake, like this:
- Events are generated in OneLogin, such as user logins, admin changes, etc.
- TEST: Make any change to track.
- After up to one minute, events are forwarded to the AWS EventBridge via your brand new webhook.
- TEST: Check the CloudWatch console in AWS for the /aws/events/eventbridge-onelogin log group to see if your event was posted.
- The event in the EventBridge triggers the Lambda function, which posts to the CloudTrail Lake ingestion channel.
- TEST: Check the CloudWatch console in AWS for the /aws/lambda/OneLoginCloudTrailLakeConnector log group to see if the Lambda function is being triggered.
- The event data arrives in CloudTrail Lake and can be found via query.
- TEST: Enter the validation query in the CloudTrail Lake console and verify that it returns all records for your event store.
Example Queries
| Validation Query | |
|---|---|
| Search for all events of a specific event type, such as USER_LOGGED_INTO_ONELOGIN | |
| Get risk scores and reasons for all risk events | |
And that’s it! From now on, all your OneLogin activity events will be securely aggregated and stored in AWS CloudTrail Lake for easy access and analysis. Enjoy!

Erik Talvi is a Software Engineer at OneLogin by OneIdentity on the Developer Experience team. He can usually be found juggling, either problems or pins.